This blog is for tracking my Deep Sky Astrophotography efforts, problems and solutions I encounter, equipment and DIY topics. Hopefully it will help others starting in this hobby to avoid some of the obstacles I've had to work through. -Josh Knutson-
Saturday, May 26, 2012
Milky Way project round 2
Milky Way Mosaic - 2 tiles
Adding more to the effort, here's two tiles combined.
Captured with Canon T1i (full spectrum modified# @ ISO 800
Canon EF50mm @ F/4.5
8x240 sec each tile, no calibration files
Stacked in DSS
Collaborative processing efforts in conjunction with Robert Farrimond (zerro1) and Salvatore Grasso (SGT500).
More to follow as additional tiles are stitched in.
Tuesday, May 22, 2012
Start of Milky Way Mosaic - Sagittarius Cloud
The night after the Solar Eclipse at Chaco Canyon, I decided to stay up and work on my summer Milky Way project. I shot 6 panels that night. Decided to process a few seperately to see how it would turn out. Here's the result.
Captured with Modified T1i @ ISO 800
50mm EF lense @ F/4.5
8 x 240 sec, no calibration files
Tracked on Vixen Polarie
Stacked in DSS
Post processed in Photoshop 7
I hope to have the full project completed soon. Stay tuned for more.
(Image also posted here - http://www.astrophotogallery.org/dso/p9602-summer-milky-waysagittarius.html)
Monday, May 21, 2012
Annular Eclipse - Chaco Canyon May 20, 2012
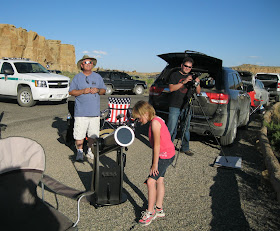
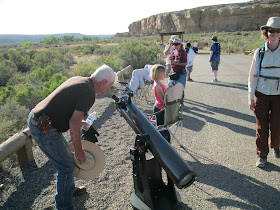
My daughter Aurora, my parents, and I planned a trip to Chaco Canyon, NM for the Annular Eclipse. The trip was fantastic. We set up my modified DSLR on the Polarie with a telephoto lense and solar modifications for a timelapse. We also leveraged Aurora's 6" Dob and attached a white light filter, and two other camera rigs. In total we captured well over 1100 images, a few dozen video segments, and 10GB of data in all (after weeding out the rejects). The skies were perfect, and I couldn't be more pleased with the results. I'll add that a number of these shots were taken by Aurora who is barely 8 yrs old.
Chaco was packed. So much so, that the rangers were towing vehicles out, locking down parking, and making people shuttle in to the canyon sites. We set up at the western-most designated viewing area in the Canyon. Countless dozens of people lined up to view through our telescopes and watch the eclipse through the live screens. We helped people take pictures of the eclipse afocally using their digicams, smartphones, etc. Many people got involved with us making our "trick/illusion" photos as time went on. One gentleman helped us stage a trick shot using his welders #14 glass plate - included below. Aurora and I also began building ad-hoc solar projection cameras for people and showing them how to cast eclipse shadows using various methods - including a few Pringles cans we brought with us. At maximum, the temp dropped approximately 10 degrees F. What we had waited for was the sunset. The eclipse was waning still, but crossed behind the far canyon wall, with formations and vegetation showing up as silhouettes against the sun. Sunspots, and lunar mountain ridges were clearly visible through the Dob, and showed up clearly in some of our images. It was simply amazing.
I hope you enjoy the images as much as we enjoyed them. More to come as I finish processing them.
Saturday, May 19, 2012
DSLR Solar modifications completed
A little teaser. Test shot I took on the 15th showing several sunspot groups. Just finished converting the DSLR over for Solar imaging this weekend. This is a still shot, not a video stacked image. My Solar processing is rusty so ignore that for the moment. I'll shoot again at twice the focal length for the Eclipse tomorrow. This is also sized down 50%. Data tomorrow will be posted full-res.
Second image is courtessy of SOHO showing current activity as of today. There are lots of active sunspot groups which should really add to the composition of images tomorrow during the Eclipse.
Wednesday, May 16, 2012
Public Outreach in Rio Rancho
Today I was invited to do another outreach event at my daughter's school. The focus this time was the Sun due to the upcoming Solar Eclipse this weekend. After giving a presentation on the Sun, and going through some pictures, Aurora and I gave a safety talk and demonstration. After that we headed outside. I procured a case of solar viewers to hand out to the kids. We also set up a couple of solar scopes. We spent the time counting sunspots and watching how they change. I showed them a picture from SOHO taken a few hours earlier, and told them they can expect some changes. They were shocked at the differences.
Decided to set one on "New Mexico" since that's where we'll be viewing the Eclipse from. = )
Aurora, helping me set up a few pieces of gear and a slideshow for her class.
Other classes and groups kept wandering by and some decided to investigate. Before I knew it, we had a decent sized crowd. We had a lot of fun this morning. All and all, a fairly good session. Lots of questions from both students and teachers. They've been given homework on things to note this weekend with the Eclipse and now have their viewers to look at it directly.
Friday, May 11, 2012
How To Dial In The Polarie Polar Scope
If you're like me, you got your Polarie Polar Scope and then sat and scratched your head after reading some very convoluted instructions in a PDF file. Having experience with other polar scopes with GEM mounts, I knew this had to be easier than it appeared. So I sucked up my pride and called Vixen and asked for a talk-through on this. I literally understood after just 30 seconds of verbal explanation without even having the scope in front of me. I took a few pics and will try to explain this as best as possible in hopes that it will help a few people out. You wouldn't believe how many e-mails and PMs I've recieved on this already. Ok, boring stuff aside, let's get down to it:
For this exercise, assume I'm setting this up at 9PM on May 11, 2012. This also assumes you have "rough aligned" your Polarie using the little peep hole in the top right.
1) Unthread the back of the Polarie and remove it.
2) Insert your Polar Scope (it's magnetic, don't worry about it falling). For starting out, let's put this at what I would call the "home position" by balancing out the bubble level at the bottom, and dial in the center dial to 0, matching the outer ring.
3) The inner dial has an outer set of numbers 1 through 12 representing the months. The small hash marks indicate 2 days. The larger hash marks indicate 10 days. The month number, if you notice, is in the center of a set of hash marks. It does count down from left to right. Left most small hash mark is day 2 for example. Turn that inner dial to bring "5" to the top for May. Since today is the 11th in our example, you're going to line up slightly between the first large hash mark on the left and the very next small hash mark - as in the picture.
4) The outer dial represents time in hours and minutes - in military time. The larger hash marks represent the top of the hour, the smaller represent 10 minute increments from Right to Left, opposite of the inner ring. Since we're setting up for 9PM we now slide the outer ring to "21" for 9PM, and we're going to line that hash mark up from the outer ring with spot on the inner ring that we identified as May 11th (between the first large mark and the next small mark) as the picture indicates.
5) Here's the part to really keep in mind. You need to subtract an hour to account for DST during this half of the year (assuming you are in an area which observes DST). No subtraction when DST changes again in Fall.
6) Now the easy part - turn the entire Polar scope by grabbing the outside of the outer ring and just rotate it until the bubble level is back at the bottom and is balanced.
You are now oriented. At this point DON'T touch the Polar Scope. Use your tripod/head to then align the Polarie on Polaris and then tighten it down. You'll notice this polar scope is not illuminated. Get a red capped flashlight and point it across the aperture to illuminate it just enough to see the lines, and then point it to Polaris. You'll notice there are precession lines in 5 year increments. Point as close as possible between the lines indicating 2010 and 2015 since our example is based on 2012. This is now good enough for long exposures in any part of the sky.
One more detail if you want to have even more precise alignment - look at the inner ring again. Notice thre are markings that say "E 20 10 0 10 20 W". This is to compensate for your position within your specific timezone. The above steps assume you're dead center in your time zone. To be as precise as possible, you need to figure out how many degrees longitude off of that center line you are, East or West. Then you turn the inner dial by approximately that amount. The indicators are in 10 degree increments, so it only takes a VERY slight movement to account for 1 degree. Turn towards "W" to compensate for being West of the center line. Turn towards "E" to compensate for being East of the center line.
Make sense? It took me a few minutes the first time or two. After that, the process takes less than a minute. I can run subs so long that I actually saturate my DSLR sensor in dark skies before I see trailing with a 50mm lense. With my 300mm lense I can still run 5 minute subs easily. I haven't tested anything longer yet, but suspect I can go longer without issue.
Good Luck!


