
Wednesday, March 30, 2011
The final piece to my new imaging rig!
Finally rounded up a William Optics 0.8x focal reducer / field flattener! I originally went for the new Orion reducer/flattener as it's essentially the same as the actual Vixen reducer, however, after finding out the hard way and wasting a month of time I discovered it uses a new thread size and not the standard M42 T-threads. With the spacing I have, this should bring me down to just around F/5.9 or better. In comparison to my F/2.0 Hyperstar running 5 minute subs, my new rig requires 21 minute subs to equate to the approximate "depth" of detail. With the reduction I should accomplish the same in under 13 minutes which is a tremendous improvement, and will have the approximate field of view as my Hyperstar, but in a much more compact and lighter setup.

Sunday, March 13, 2011
Hi-Res Polar Field Rotation Imaging
This is a compilation of high resolution imaging near Polaris. Normally people shoot Star Trails with widefield DSLRs with a short focal length lense and take in 20-30 degrees of sky. I decided to shoot at high resolution with the QHY-9 through the Vixen @ 600mm (approximately 2 degrees of sky) to show the "actual" polar location in more detail. First image is 120 minutes of 60 second exposures combined to show the Earth's rotation. The bright star is Polaris, showing that indeed it's about a half degree away from the "true" pole. Second and third image is a compilation of 5.5 hours of rotation. Gradient caused by moon glow. Still working on reprocessing it for a better compilation... See the images directly at full scale at my flickr site (click image once it loads to fully expand. You can see the individual star locations every 60 seconds, and the gaps between caused by camera download time) - Josh's Flickr Photostream


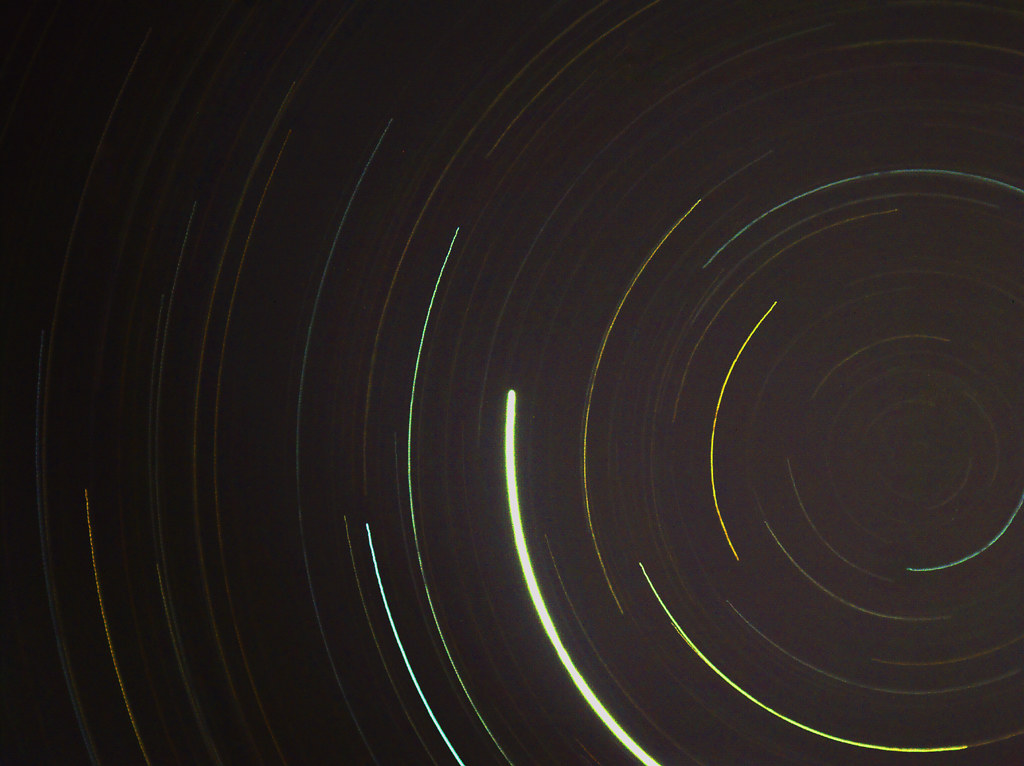
These images are created by simply parking your mount in the part of the sky you want to image, and leave it off (no tracking). Run exposures at a consistent length i.e. 30 sec, 60 sec, or whatever. Stack them with "no alignment" and "average". Post process accordingly.
I'll take the opportunity to point out to anyone starting out that this is the reason why polar alignment is so important in DSO imaging. If you drill in on the first shot you can see how much the sky moves in just 60 seconds. In fact, you can see that it moves significantly enough in just 15 seconds (gap between each dot caused by camera download time) and that it's enough to distort or cause trails in your long exposure shots if your alignment and tracking is poor. I used to be one of those who thought "eh, Polaris is close enough" to do a polar alignment. I have corrected that practice in the last year or so. This was also with relatively short focal length imaging (600mm). Imagine how much this rotational effect is multiplied at 2000mm imaging for example. If you're serious about DSO imaging, polar align as best as you can.
Saturday, March 12, 2011
Lunar imaging with DSO autoguider
While I'm still awaiting my field flattener for the Vixen ED80SF, I decided to play around with my autoguider a bit. Took the QHY-5 out of my guider and threaded it on to the Vixen. Shot a 2000 frame stack of the Moon yesterday in daylight, and unfiltered. Pre-processed in AVIStack 2, manually stitched and Post-processed in Photoshop. Here's the result of a 3 panel mosaic shot in 640x480 mode, @ ~35 fps.


Thursday, March 10, 2011
One last pass before correcting the optics...
Ran another 12 sub-exposure stack on the Horsehead. Unfortunately this will be my last pass this season since I won't have my field flattener and reducer before it's too low in the sky. It still isn't as deep as the F/2.0 Hyperstar version I made a few months back, but for an 80mm F/7.5 OTA with uncorrected optics, with a lower QE CCD camera, I can't complain with the results I suppose. The coma is still apparent. I also figured out I'm still a little bit off on the camera calibration and settings so working to correct that particular oversight for my next imaging run at new moon. For now this is it. (click image to expand)


Here's my hyperstar shot to comare against:

More hurdles
The Orion Reducer-Corrector for ED80 scopes doesn't have normal T-Threads. They are 48mm vs 42mm. The QHY-9 won't mate up with it. The options were to hunt down an adapter, or return it and go another avenue. Given the poor treatment I got from the Orion tech support on this issue, and on the thought that more parts tends to lead to more problems (possible flexure in this case) I decided to return it.

So after doing some research the William Optics .8x focal reducer/field flattener III seems to be the way to go. Unfortunately I have to wait until close to the next New Moon cycle to shoot again. Won't have the old one refunded and the new one procured and delivered for at least two weeks at best.
Despite dealing with the coma, long exposure times, and having to seriously crop my images for the moment, it didn't stop me from tinkering. Here's a small 12 sub-exposure stack of the Rosette Nebula, no flats applied, just darks. Still working out issues with Flats on the new camera.
 Acquisition and pre-processing done by yours truly. Post processing magic applied graciously by Sal Grasso. He has a knack for working with poor data to produce a decent or even an amazing image. Considering this short integration time, I thought it came out quite well.

So after doing some research the William Optics .8x focal reducer/field flattener III seems to be the way to go. Unfortunately I have to wait until close to the next New Moon cycle to shoot again. Won't have the old one refunded and the new one procured and delivered for at least two weeks at best.
Despite dealing with the coma, long exposure times, and having to seriously crop my images for the moment, it didn't stop me from tinkering. Here's a small 12 sub-exposure stack of the Rosette Nebula, no flats applied, just darks. Still working out issues with Flats on the new camera.

Sunday, March 6, 2011
Astrometry
Finally started running some of my images through the Astrometry program on Flickr to do some high level mapping of objects as you mouse over the image. Saves me a ton of time, and quickly identifies the major objects in each shot. I was impressed just how well it worked.
Flickr Album
Click on the images with starfields in them for examples. Works great! I'll have to round up some more of my past images and run them through Astrometry.
Flickr Album
Click on the images with starfields in them for examples. Works great! I'll have to round up some more of my past images and run them through Astrometry.
First Blog Post
My new equipment assembly is nearly completed. Recently sold off my Nexstar 8GPS/Hyperstar rig due to physical limitations with my reconstructed shoulder. I purchased the following to replace it with:
OTA - Vixen ED80SF 600mm F/7.5 APO
Mount - Celestron CGEM Equatorial mount
Camera - QHY-9 8.6MP OSC CCD w/ 2-stage TEC cooling
Guidescope - Modified 50mm finderscope with KWIQ adapter
Autoguider - QHY-5 1.3MP Monochrome CCD
Misc - Orion 2" extension, 64bit Serial-to-USB adapter, Scopestuff HC extension, Orion .85x Focal Reducer/Field Flattener
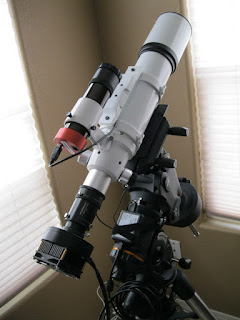

Tested the gear a little over a week ago. Still awaiting the focal reducer/flattener. First impressions - with this big CCD chip, there is visible coma in the optics, so I've halted any further imaging until the reducer/flattener arrives this week. Focuser works great, no obvious chromatic abberation, no focuser flexure.
The CGEM was able to track due south in the sky for hours and capture 10 minute sub-exposures with no adjustments, just an alignment routine. I made a second outing trying to dial in the balancing, and mount settings. I found a backlash setting of about 25 in both axis to be adequate. Any more and the Autoguiding (PHD) software is having to increase its corrections to an unacceptable level, and the mount is jumping far enough to introduce tracking errors into the exposures. Also had to adjust the PHD calibration step up from the default 750ms to 1000ms which gave near perfect results. At 1500ms (ideal for shorter focal lengths) was just too long. The correction commands were all over the place for some reason. With these settings I pushed 20 and 30 minute exposures for over 9 hours, using both sides of the meridian, and no visible tracking errors introduced in the images. The largest correction I saw was about .17 pxl, with an average of about .10 pxl, and a correction frequency of about 1 per every 15-20 seconds. Not bad at all.
The QHY-9 is a very different animal from my prior QHY-8. It has a mechanical shutter as opposed to none (my heart skipped a few beats the first time I heard the shutter go "thunk!"). Regulated cooling as opposed to on/off @ maximum. The chip has much more noise in comparison as well. I didn't have to run darks with the QHY-8. It's mandatory for me with the QHY-9 on long exposures. I had to do a lot of indoor tinkering to find optimal gain and offset settings for the camera. My conclusions were gain 40-50% and an offset of 90. I keep ending up with some sort of artifact in the image that I don't know quite how to describe just yet, but am still working on diagnosing the cause and a solution to remove it without having to resort to photoshop touch-ups. It's nowhere near as sensitive as a QHY-8, but it does have it's own benefits such as the improved cooling, and more pixels. I can shoot my darks from inside with the regulated cooling. Still tinkering with flat calibration. Seems about 35,000 ADUs peak is about right. That equates to 5 second exposures inside pointing at my dining room light fixture using the "white t-shirt" method.
In summary my initial impressions are good. Dying to get a hold of that flattener/reducer for an all-out run to draw some final conclusions.
First test shot from the gear - Horsehead and Flame nebulas. A small stack of 300 second sub-exposures, post processed in Photoshop. Cropped about 25% of the image due to coma, and scaled down to 33% of original size for web purposes.

Subscribe to:
Posts (Atom)


